How to Clean Your Air Fryer Properly (Without Ruining the Non-Stick Coating)
Most people clean their air fryer wrong, then wonder why it stops working well. Here's the right way to clean every part — including the heating element nobody thinks about — plus the deep-cleaning method that actually removes baked-on grease.
Most people clean their air fryer basket and call it done.
This is why most people's air fryers smell weird after six months. The basket gets washed because food sits in it visibly. The crisper plate gets washed because it has obvious grease on it. But the heating element on top of the cavity — the part that actually does all the work — never gets touched. Six months later, the grease residue on it has been baked and re-baked dozens of times, and every cooking session releases a small amount of carbonized smoke into your food.
I learned this the hard way. My first air fryer started producing strange smells around month four. I assumed something was wrong with the unit. Turned out I had been ignoring the part that needed cleaning the most.
This guide walks through how to actually clean every part of an air fryer — daily, weekly, and the deep clean you should do once a month. Plus the most stubborn problem nobody warns you about, which is baked-on grease that's been sitting in the basket for weeks.
Why air fryer cleaning matters more than you think
Three things happen when you don't clean an air fryer properly.
The first is smell. Grease residue accumulates on the heating element, the cavity walls, and the basket. Every time you cook, those old residues heat up and release particles into the air. After enough cycles, your kitchen smells faintly like burned grease for an hour after every cooking session.
The second is performance. A coated heating element transfers less heat than a clean one. Food takes longer to cook, comes out less crispy, and the air fryer works harder to do the same job. The fan motor wears out faster because it's trying to compensate.
The third is durability. The non-stick coating on the basket is one of the more delicate things in your kitchen. Using the wrong cleaning tools (steel wool, abrasive sponges, harsh chemicals) damages the coating in ways you can't see at first. Once the coating starts breaking down, it sheds particles into your food, and the basket needs to be replaced.
Proper cleaning prevents all three of these. And proper cleaning is not complicated. Most of it is just doing the right thing consistently.
After every use: the 2-minute routine
This is the cleaning that matters most. Done consistently, you'll almost never need to deep clean.
Unplug the air fryer. Let it cool for at least 10-15 minutes. Hot air fryers can burn you, and dripping water on a hot unit can warp components or damage the coating.
Pull out the basket and crisper plate. Most are dishwasher safe — check your manual. If your basket and plate are dishwasher safe, just throw them in. This is the easiest cleaning method by a wide margin.
If they're not dishwasher safe, or you don't want to use the dishwasher: fill the basket with warm water and a few drops of dish soap. Let it sit for 10 minutes. Then wipe with a soft sponge. The soaking does most of the work — you barely need to scrub.
Wipe the inside of the cavity with a damp cloth. This is the step most people skip. Grease splatter accumulates on the walls during cooking. A 20-second wipe-down with a damp cloth prevents that splatter from baking on.
Look at the heating element on the top of the cavity. If you can see grease or food residue on it, give it a gentle wipe with a damp cloth. Don't use soap directly on the heating element — water and electrical components don't belong together. Just a damp cloth.
That's it. Two minutes, done. If you do this after every cook, you'll rarely need anything more aggressive.
The weekly deep clean
Once a week, or whenever the unit starts smelling, do a more thorough version of the above.
Same starting steps: unplug, cool, remove basket and crisper plate.
Wash the removable parts more thoroughly. If you have baked-on grease that didn't come off with soaking, make a paste of baking soda and warm water. Spread it on the stubborn spots. Let it sit for 15 minutes. Then scrub gently with a soft sponge or soft-bristle brush. The baking soda breaks down the grease without damaging the coating.
Per Cosori's own care guide, this method is what their engineers recommend. Do not use steel wool, harsh brushes, or sharp tools. Once the coating is scratched, food starts to stick, cleaning gets harder, and eventually the coating begins to peel.
Pay attention to the heating element. Once a week, look at it carefully. Are there charred bits stuck to it? A soft-bristle brush or a wooden skewer can gently dislodge them. Don't scrape with metal.
Wipe down the exterior. Grease tends to creep onto the buttons, the handle, the top of the unit. A damp cloth with a tiny bit of dish soap handles this. Dry thoroughly afterward.
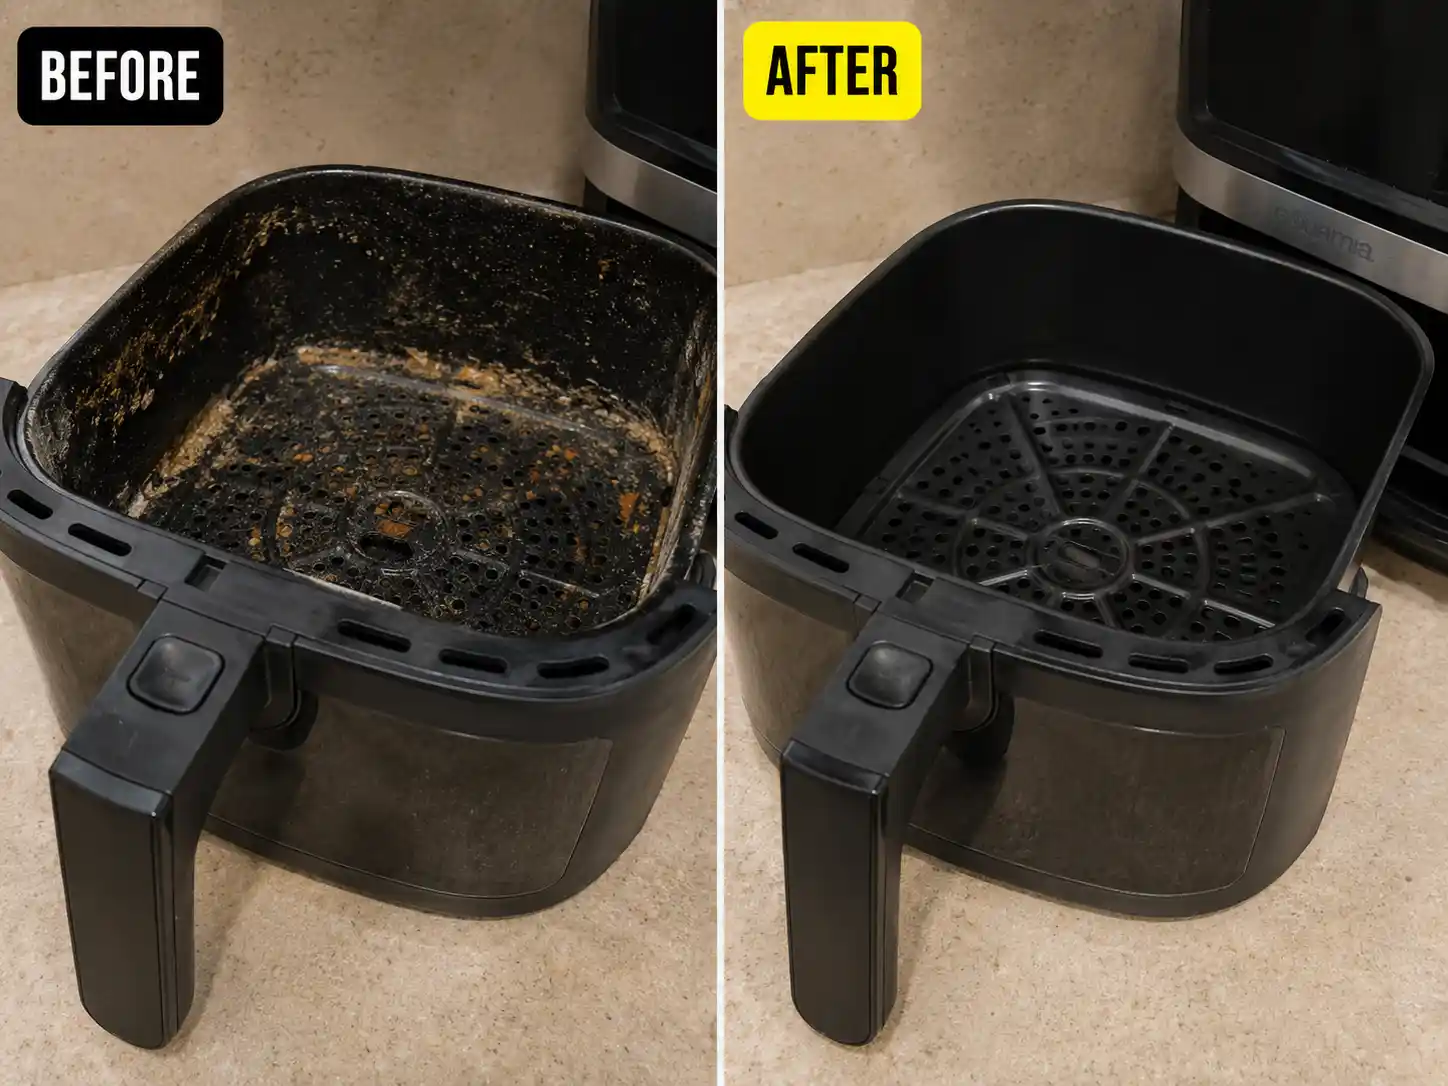
The monthly deep clean — for baked-on grease
If you've been doing weekly cleaning, you probably won't need this. But if you've inherited an air fryer, bought a used one, or let the cleaning slide for a while, here's how to handle stuck-on grime.
The technique that consistently works across multiple cleaning experts uses dish soap and water heated inside the air fryer itself.
Remove the basket and crisper plate. Wipe out any loose food bits.
Put the crisper plate back into the basket. Drizzle a few squirts of dish soap onto it.
Fill the basket with warm water until it's just above the crisper plate.
Put the basket back into the air fryer. Set the temperature to 400°F and run it for 5 minutes.
After the cycle ends, don't open the basket immediately. Let it sit inside the unit for another 10 minutes. The combination of steam, heat, and dish soap loosens grease that handwashing can't touch.
Carefully remove the basket (it will be hot). Dump the water. Wash the basket and plate normally with warm soapy water. The baked-on grease should come off easily now.
This method comes up in multiple cleaning guides for a reason — it works. The steam penetrates places a sponge can't reach. The hot soapy water dissolves grease that's been sitting for weeks.
For really stubborn grease: the paste method
If the steam method doesn't get all of it, here's the more aggressive option.
Mix 1/4 cup of baking soda with a squirt of dish soap. Add enough warm water to make a paste — about the consistency of toothpaste.
Apply the paste to the stuck-on areas. Cover them generously.
Let it sit for 15-20 minutes. This is the key step — the longer the paste sits, the more it dissolves the grease.
Scrub gently with a soft sponge or soft-bristle brush. Add more paste or water as needed.
Rinse thoroughly with warm water. Dry completely before putting back in the air fryer.
This handles almost any grease problem that hasn't actually fused with the coating. If grease is still stuck after this, the coating may be damaged underneath and the basket might need to be replaced.
What never to use
A few cleaning tools and chemicals show up in cleaning hack videos but actually damage air fryers.
Steel wool and metal scouring pads. These scratch the non-stick coating immediately. Once scratched, the coating starts to peel and you have weeks instead of years left on the basket.
Magic Erasers (melamine sponges). These work like very fine sandpaper. They remove dirt but also abrade the non-stick surface. Several cleaning guides flag this as a common mistake — they look gentle but they're not.
Oven cleaner. The chemicals are designed for unfinished metal oven interiors. They will strip non-stick coatings.
Abrasive powder cleansers (like Comet or Ajax). Same problem as the magic eraser, just more aggressive.
Bleach. Not designed for cooking surfaces. Residues can stay in cracks and end up in your food.
High-pressure water on the housing or heating element. The unit has electrical components inside the housing. Submerging the body or spraying water at it can damage the electronics.
Stick to dish soap, baking soda, vinegar (occasionally for odor removal), and soft sponges or brushes. That's all you actually need.
Cleaning the heating element specifically
The heating element is the part most people don't know how to clean. It's tucked at the top of the cooking cavity and looks like a metal coil or rod.
Unplug the unit. Wait until it's completely cool — at least 30 minutes after the last use.
Flip the air fryer upside down or tilt it so you can see the element clearly.
Look for grease buildup, charred residue, or stuck-on food particles.
For light buildup: wipe with a damp cloth. Just water, no soap.
For stuck-on residue: use a soft-bristle brush or a wooden skewer. Gently dislodge the bits. Don't scrape with metal.
For greasy coating: dampen a cloth with very dilute dish soap solution, wring it almost dry, and wipe the element. Then wipe again with a clean damp cloth to remove any soap residue. Do not let water drip down into the unit.
Let the element dry completely before plugging the air fryer back in. This usually takes 30 minutes to an hour.
Once a month is enough for most users. If you cook a lot of fatty foods (bacon, fatty chicken), check more often.
Removing odors
Sometimes an air fryer smells weird even after a thorough cleaning. Usually this is residual oil that has soaked into hairline scratches in the coating, or grease that's deep in crevices the sponge can't reach.
Two methods work for this.
The first is the vinegar steam method. Pour 1/4 cup of white vinegar into the empty basket. Run the air fryer at 200°F for 3-5 minutes. The vinegar steam neutralizes odors and reaches places water can't. Let the unit cool, wipe out the residual liquid, and the smell is usually gone.
The second is a lemon and water steam. Same as above, but with lemon juice instead of vinegar. The acid in the lemon breaks down odors. Some people prefer the smell.
Don't use both at once — just one at a time.
A realistic cleaning schedule
Here's what actually works for most people, based on cooking habits:
If you use your air fryer a few times a week: clean the basket and crisper plate after each use. Wipe the cavity walls weekly. Clean the heating element once a month.
If you use it daily: same routine, but check the heating element every two weeks instead of monthly. Wipe the cavity walls every two or three days.
If you cook a lot of fatty foods (bacon, fatty meats): increase the frequency. Daily heating element checks become reasonable. The grease buildup is just faster.
If you only use it occasionally (once a week or less): basket cleaning after each use is enough. The element doesn't really need attention until you can see something on it.
The thing that ruins air fryers isn't lack of perfect cleaning. It's letting cleaning slide for weeks at a time and then trying to do everything at once. A 2-minute clean after each use is much easier than a 30-minute deep clean once a month.
For more on what to do when your air fryer is already smoking from neglected cleaning, our troubleshooting guide on smoke walks through the specific fixes. For making sure you have a basket worth cleaning in the first place, our complete guide to air fryers covers what to look for in models that hold up over time.
Most modern air fryer baskets are dishwasher safe — Ninja, Cosori, and Instant all confirm this for their main lines. Always check your specific model's manual. Dishwashing is gentler on the coating than hand-scrubbing with abrasive sponges, despite what the conventional wisdom says.
For most people, once a month is enough. If you cook fatty foods often or use the fryer daily, every two weeks is better. The signs you need a deep clean: smoke during cooking from a clean-looking unit, persistent smell after wiping out the basket, or visible residue on the heating element.
Yes, for cleaning and odor removal. Dilute white vinegar with water (1:1 ratio) for cleaning the cavity. For odor removal, run a small amount of straight vinegar in the empty basket at 200°F for a few minutes. Don't use vinegar directly on the non-stick coating — it can degrade the surface over time.
Sticky residue is usually oil that's polymerized — it's chemically bonded to the surface from repeated heating. The dish soap + steam method (running soapy water at 400°F for 5 minutes) typically dissolves it. If it doesn't, baking soda paste with 15-20 minute soak time usually does.
No. Magic Erasers are fine abrasives that work by sanding away the surface. They look gentle but they damage non-stick coatings. Multiple cleaning experts specifically flag this as a mistake to avoid. Use a soft sponge or soft-bristle brush instead.
Usually this means the heating element wasn't cleaned, or there's grease in a crevice you can't see. Try the vinegar steam method (1/4 cup vinegar, 200°F, 3-5 minutes). If the smell persists, check the heating element more carefully and consider that some residue may have penetrated micro-cracks in the coating.
No. Bleach residues stay in scratches and porous surfaces and can transfer to your food. It's also unnecessarily harsh for grease, which dish soap handles fine.
Any reasonable grease-cutting dish soap works. Dawn comes up in multiple cleaning guides because it cuts grease aggressively. The cleaner doesn't matter as much as the technique — soaking for 10-15 minutes before scrubbing makes the biggest difference.
Replace the basket. Peeling coating sheds particles into food. Most major brands sell replacement baskets for $20-40 — much cheaper than a new air fryer. Check the manufacturer's website for compatible parts.